Web Services in Apache Hop
Introduction
Apache Hop is a very flexible tool for developing data flows (so-called pipelines) with the help of an easy-to-use UI, with which data can be extracted from different sources, consolidated and loaded into a new system (ETL).
The tool is not only excellently suited for these classic data warehouse tasks or for database migrations. In the context of low-code software development, Apache Hop can also be used to provide fast calculations and data queries as a web service without much programming effort and to link these calculations to your own web services. Hundreds of lines of source code are eliminated, as the functionality can be conveniently implemented as a pipeline with its dozens of transforms (processing steps) in the Apache HOP UI and integrated as a web service.
The following illustration shows an example of where Apache HOP can be integrated with web services in a full-stack architecture (multi-container application).
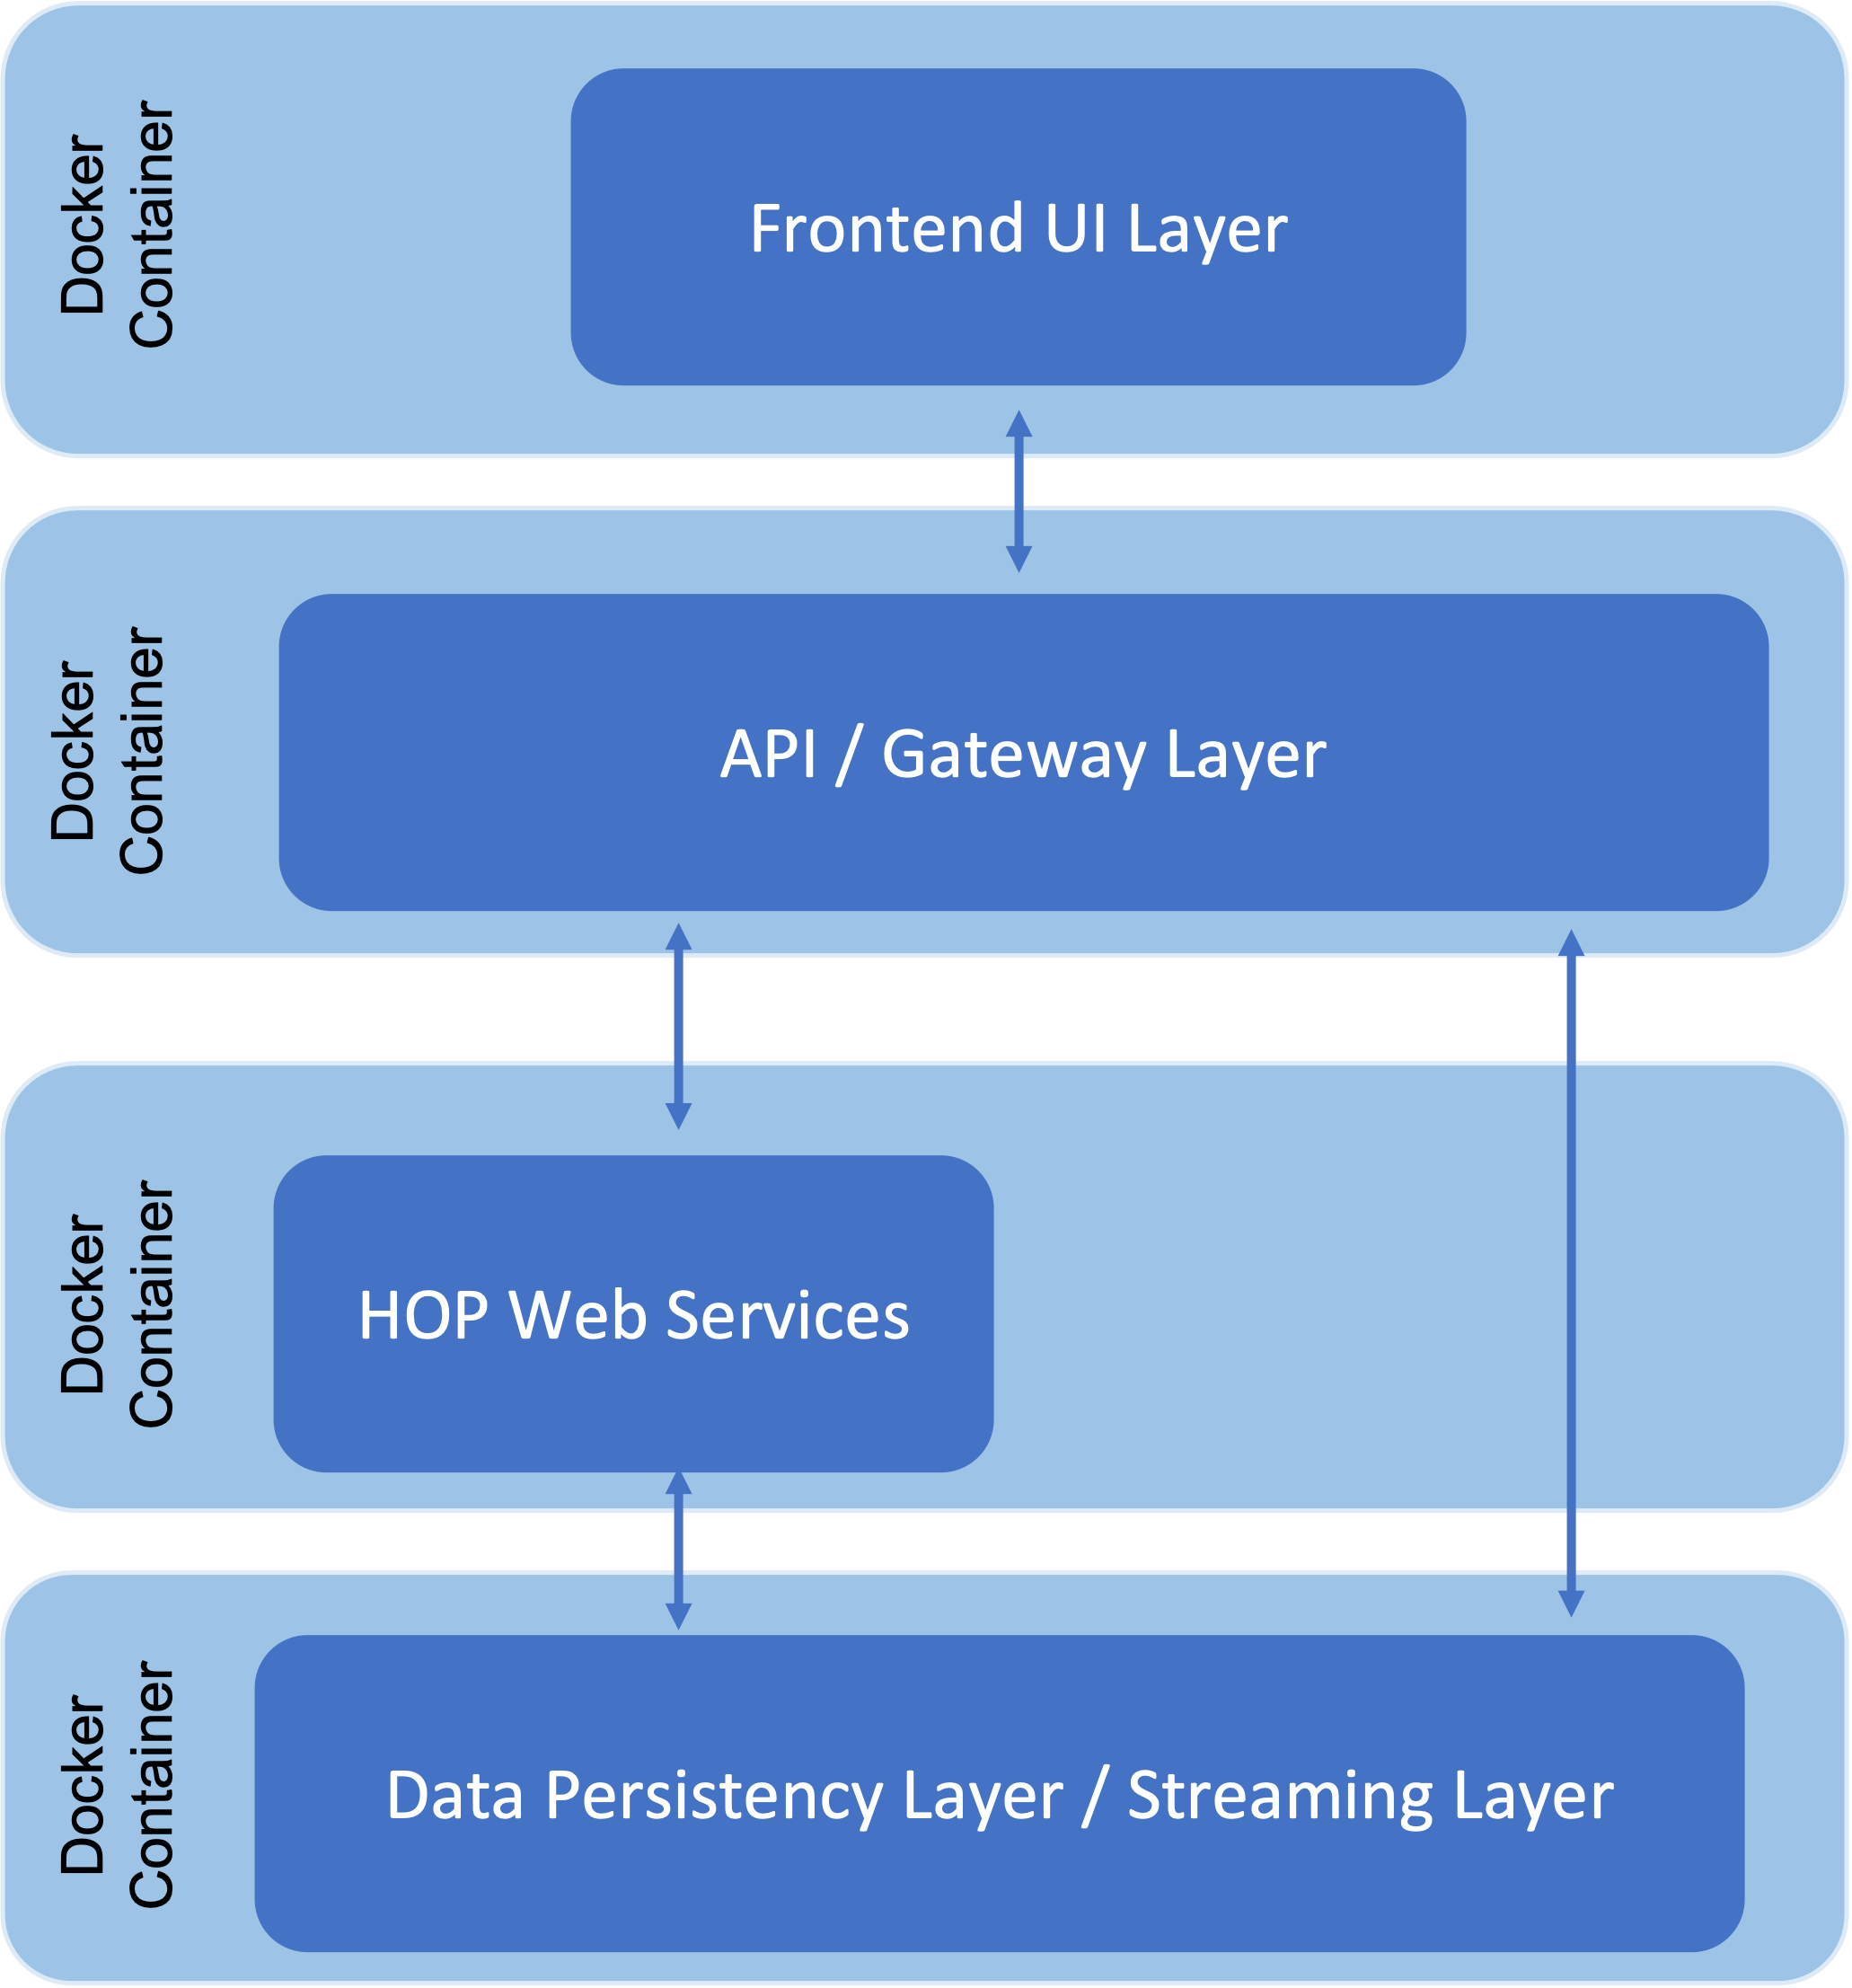
In order to call the created Hop web services from a Java application, for example, the Apache Hop server on which the pipelines are executed is required. The Hop server provides a web interface (servlet) to return the results of the execution.
It can be run on a dedicated server or inside a Docker container. The latter option offers the advantage of scaling quickly when needed.
Running Pipelines as a Web services in a Docker container
This guide covers the steps to create an example web service and subsequent deployment in a Docker container.
Step 0: Requirements for the web service
The task of the fictitious example web service in this tutorial is to provide data in real time for a project dashboard (specifically: the number of active/inactive teams per team type), so that after processing in the API layer, the data can be displayed in the frontend as a stacked bar chart. The data is available in normalised form in the database and must first be prepared by the web service.
Step 1: Creation of the pipeline
After creating the project and setting up the database connection in HOP, the following pipeline is created (file name: countTeams.hpl):
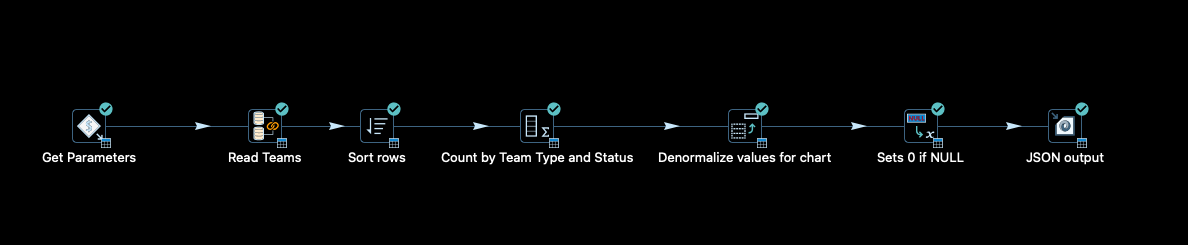
The pipeline expects a project ID as an input parameter in order to be able to read out the teams belonging to the project from the database. The data is grouped, then the number is calculated and finally denormalised by team type. The result of the execution should be returned in JSON format.
Step 2: Meta Data Configuration
To make the pipeline available as a web service, metadata must be created for it and later made known to the Hop server. The use of metadata has the advantage that the calling application only needs to know the web service name, the details of the underlying implementation (especially the location of the pipeline) remain hidden.
The following metadata are created for the pipeline under the Web Service tab:
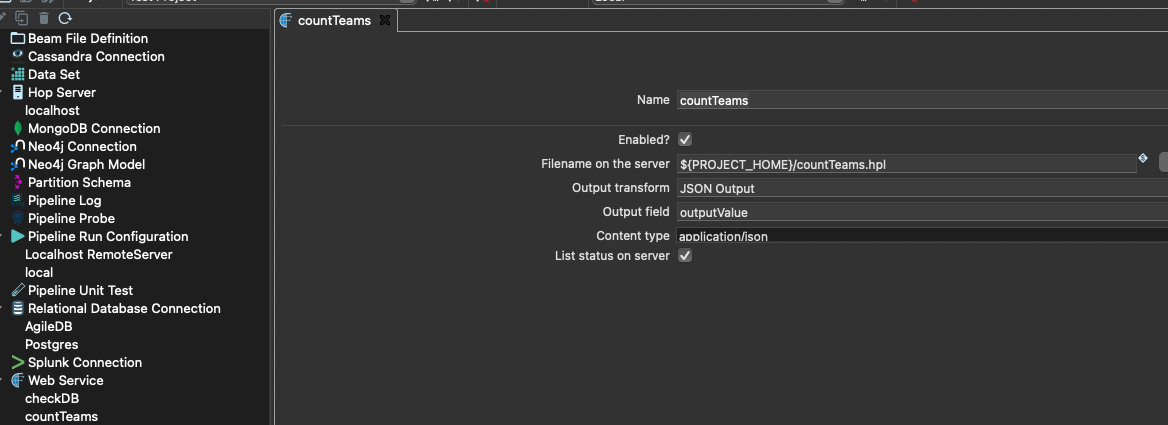
The Name field contains the name of the web service under which the calling application will call the service. The Filename field contains the assignment to the storage location of the pipeline. The Output transform field contains the name of the transform that provides the result in the output field to be specified. Content type specifies the output format of the return stream. In addition, you can further specify in the metadata whether the web service should be disabled (Enabled?) and whether the status of the execution should be listed in the statistics of the web server UI.
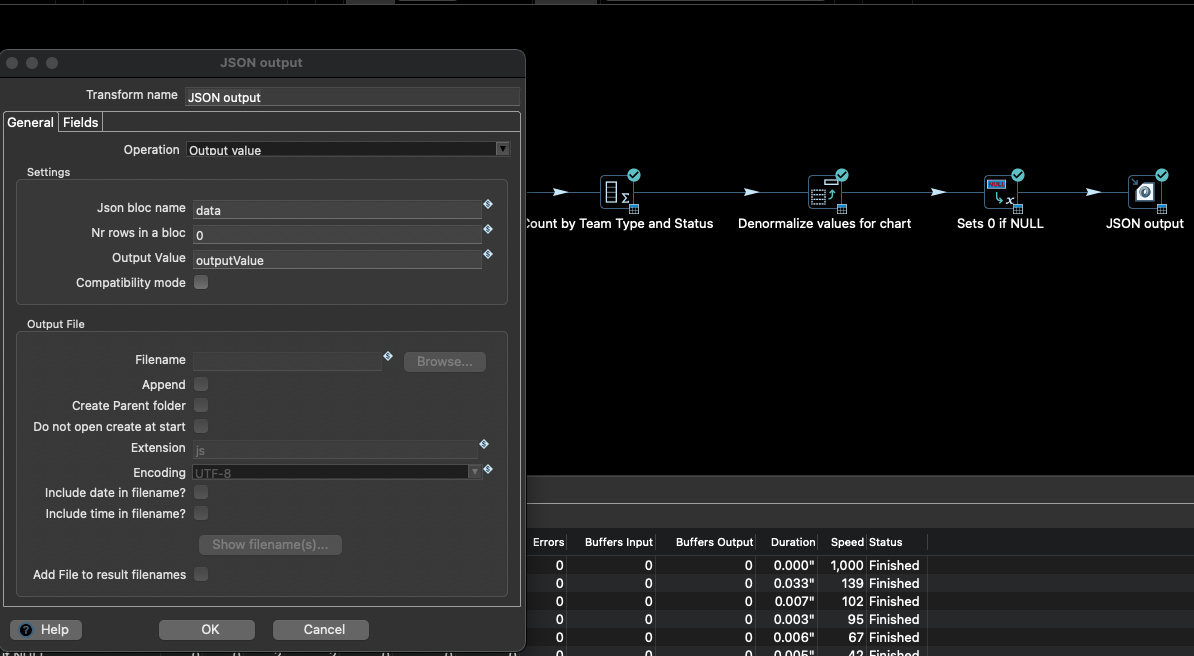
In the pipeline listed above, the content of the output field outputValue of the Transform JSON Output is to be returned as the result:
After saving the metadata, everything is ready to run the web service in a Docker container.
Step 3: Set up configurations for different runtime environments
In Apache Hop it is possible to set up runtime environments for different environments (e.g. Development Local, Docker Single, Docker Multi-App) via so-called configurations and to pass them to the pipeline without having to adapt or duplicate the pipeline itself (e.g. one pipeline for each environment).
Connection details (e.g. DB server URL) for database connections, etc. can be stored as variables in configuration files.
For example, to set up a new database connection whose connection details may differ depending on the environment, enter the name of the environment variable (e.g. ${DB_HOST}) instead of a concrete server URL.
As soon as you select an environment and the variable is contained in its configuration file, the variable in the DB configuration is replaced by the value from the environment configuration.
This functionality is very helpful, for example, to test the pipeline against different environments before you start the deployment on the Hop Server.
This functionality is also essential for multi-container applications (see above: full-stack architecture), whose service results from the interaction of different and externally isolated containers.
A separate environment configuration is therefore necessary if you want to start your application with Docker Compose in addition to your development environment (in this example, the ${DB_HOST} variable would have the service name of the DB Container instead of the IP address of the DB Server).
Step 4: Set up and start Docker Container
To start the Hop Server inside a Docker container, you have the following options for building the container:
-
Using the image provided by Apache Hop
-
Use the Apache Hop image as a starting image and add application-specific customisations in the form of a new image (e.g. include the Hop project with its workflows and pipelines as well as third-party APIs).
-
Creation of a complete custom image (possibly based on the DOCKERFILES provided in the Apache Hop Github repository).
Depending on the deployment strategy, it may be advisable to include the project and its source code in the image, e.g. if only containers may be deployed in a production environment.
The first option is sufficient for this guide, as all adjustments can be transferred to the Docker container via environment variables for the example.
In addition, changes to pipelines should be made visible immediately without having to rebuild the image first.
For this purpose, it is necessary to mount the location of the project (incl. subdirectories for JDBC drivers and the metadata configuration) into the Docker container.
First download the Docker image:
docker pull apache/hop:<tag>
Example: docker pull apache/hop:1.1.0-SNAPSHOT
To execute the containers afterwards, the following environment variables or parameters must be set as a minimum:
| Variable/Docker Parameter | Example value | Description |
|---|---|---|
HOP_SERVER_USER | admin | Admin user to log in to the UI of the Hop Server |
HOP_SERVER_PASS | admin | Password for logging into the UI of the Hop Server |
HOP_SERVER_PORT | 8182 | Port of the server (internal) |
HOP_SERVER_HOSTNAME | 0.0.0.0 | Docker internal IP address of the host |
HOP_PROJECT_NAME | Proj1 | When the container is created, a project with all necessary configurations is initially created, therefore the project to be specified serves as a placeholder. |
HOP_PROJECT_FOLDER | /files | Root folder containing the project |
HOP_ENVIRONMENT_NAME | Local | Name of the environment with which the container is to be started (e.g. local, prod) - see step 3 |
HOP_ENVIRONMENT_CONFIG_FILE_NAME_PATHS | /files/config/localTestConfig.json | Comma separated list of all environment files (see step 3) |
HOP_SERVER_METADATA_FOLDER | /files/metadata | Directory containing the metadata information (in this case, the metadata associated with the web service). |
HOP_SHARED_JDBC_FOLDERS | /files/jdbc | Directory containing all required JDBC drivers (e.g. for MySQL, Oracle) that are not included in the standard delivery. This is a comma separated list defaulting to lib/jdbc |
p | 8182:8182 | Mapping of the internal Docker port to the port of the Docker host |
V | /my/path/to/location:/files | Mount path and mapping to a Docker internal path |
Name | Name of the Docker container |
In the technical documentation for Apache HOP running as Docker Container (pls see docs), further parameters are listed (e.g. when using SSL), which have been omitted here for simplification.
Example call:
docker run -it --rm \
  --env HOP_SERVER_USER=admin \
  --env HOP_SERVER_PASS=admin \
  --env HOP_SERVER_PORT=8182 \
  --env HOP_SERVER_HOSTNAME=0.0.0.0 \
  --env HOP_PROJECT_NAME=proj1 \
  --env HOP_PROJECT_FOLDER=/files \
  --env HOP_ENVIRONMENT_NAME=Local \
  --env HOP_ENVIRONMENT_CONFIG_FILE_NAME_PATHS=/files/config/localTestConfig.json \
  --env HOP_SERVER_METADATA_FOLDER=/files/metadata \
  --env HOP_SHARED_JDBC_FOLDERS=/files/jdbc \
  -p 8182:8182 \
  -v /my/path/to/location:/files \
  --name test-hop-container \
 apache/hop:1.1.0-SNAPSHOT
Step 5: Call Web Service
If the container has been started successfully, the web server GUI can be opened via http://<IP_HOST>:<PORT_HOST>/hop/status/ which gives an overview of the pipelines and workflows called up after logging in (using the administrator IDs passed).
To call a web service with the name <NameofService>, the following request is necessary:
+http://<IP_HOST>:<PORT_HOST>/hop/webService?service=<NameofService>&Param1=Value&Param2=Value2….
The WebService countTeams from this tutorial expects the parameter PARAM_PROJECT_ID.
The call is made as follows:
+http://localhost:8182/hop/webService/?service=countTeams&PARAM_PROJECT_ID=63

As mentioned at the beginning of the tutorial, the API layer above can now process the JSON output and pass it to the front end, which then uses the processed data to create the chart.
Conclusion
Apache Hop Pipelines as web services are easy to set up via meta-data configurations and can be easily deployed via Docker. They are suitable everywhere to synchronously return results quickly that do not require a long processing time. As of version 1.1, Apache Hop also supports the use of workflows as web services.
Here, the call is asynchronous, i.e. when the service is called, a unique ID of the workflow to be executed is returned immediately and the execution starts in the background on the HOP server (for details check the docs).